

How To Insert Border In Photoshop Cc
How to Add together a Border in Photoshop
by Alexandra Bateman on Apr 18, 2022
How can you lot make your image stand out? The answer may be as simple as adding a edge in Photoshop CC!
Borders tin can frame your image to add a creative impact that could otherwise be missing.
In this tutorial, we'll comprehend:
- Types of Borders in Photoshop
- Easiest Means to Add a Border in Photoshop
- Steps for Adding a Border in Photoshop
- Best Tutorials for Adding a Border in Photoshop
Of course, this tutorial is only useful if you already have Photoshop downloaded on your computer! You tin get Photoshop through Adobe's Creative Cloud Plan for only $ix.99/calendar month. This plan also includes Lightroom for all of your photograph editing needs!
Types of Borders in Photoshop
You tin can create 2 types of borders in Photoshop CC for your photos. Though two options may not seem like many, these are all you need to exist able to make the border you've been imagining to complete your motion-picture show.
Solid borders are borders with straight lines that become around each side of your photo. Imagine a photographic print that is framed with a mat. In Photoshop, you tin can create a solid edge around your picture as though it were framed with a mat. A white border or a black border will take this appearance.
You tin customize every aspect of a solid border in Photoshop, including its width, color, and fill blueprint. Though information technology is called a "solid border," you tin can fill a solid border with a slope or pattern instead of a solid color.
You can likewise adjust the width or thickness of your solid border. If you'd similar, y'all can make the pinnacle and bottom edge widths unlike from the border widths of the sides. Photoshop allows y'all total command over the solid borders you create.
Solid borders come in traditional square and rectangle shapes, but they tin too be manipulated to feature rounded corners for a less geometric look. Rounded corners expect great on all kinds of photos!
Photoshop also helps you lot create custom borders if you want something more than a solid frame around your picture. Using Photoshop's brush tool, y'all tin create any kind of custom border y'all want.
For example, you could use a chalk-like castor to paint a chalkboard border around your image. Or, yous could select a leaf pattern brush to brand a border of falling leaves for your photo. With Photoshop's vast library of brushes, the choice is really yours!
Both types of borders should exist applied to your paradigm after you've finished all retouching. Brand certain all of your photograph editing is finished, like adding warmth and adjusting exposure, before you create your border. Borders simply piece of work on single layers, so your background image must be contained on one layer.
Easiest Means to Add a Edge in Photoshop
Perhaps yous want to add a polaroid frame to a portrait of your family. Perchance you lot want to create a custom edge for your landscape photography photo. Whatever the case may exist, this tutorial is for you.
Now that you know what kinds of borders Photoshop can create, allow'southward talk nearly how to create your ain border.
What are the easiest ways to add a border in Photoshop?
Creating a Solid Border
The simplest edge to create is a solid frame. To create a solid border, first open your photo in Photoshop.
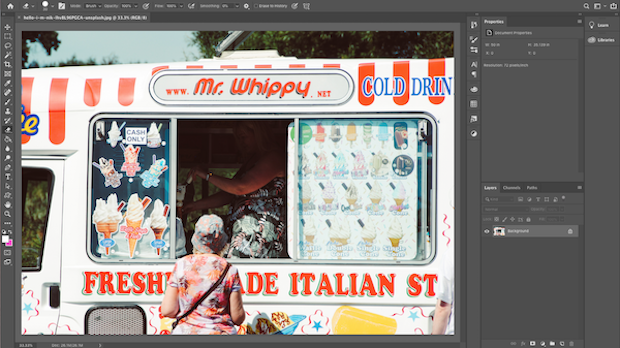
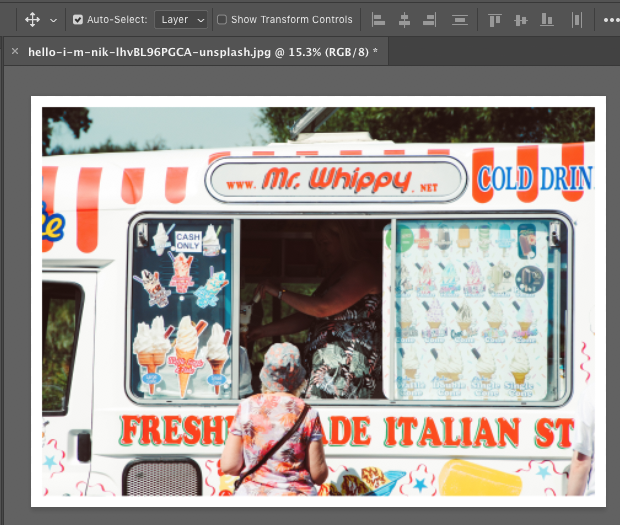
For the purposes of this tutorial, I'll be working with an unedited photo:

If you are adding your border to an edited photo with multiple layers, make sure to flatten your layers first.
To flatten layers in Photoshop CS or CC, select all active layers in the Layers panel at the bottom right-hand side of the workspace. Then, right-click and select Flatten Image from the drop-down menu that appears.
Your workspace will await like this:
Then, navigate to the Layers panel over again. Find the layer containing your photo. Click on the padlock icon in one case to unlock the layer.
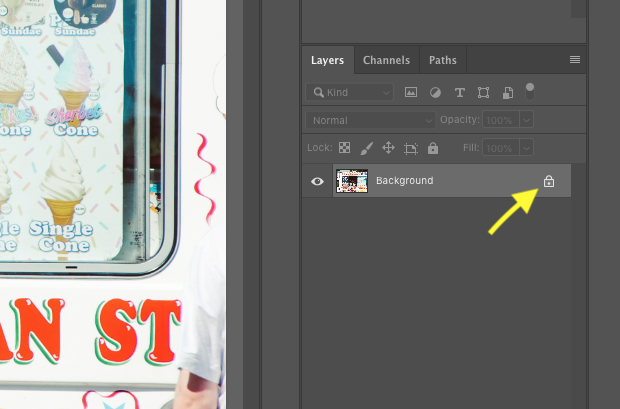
The layer name will change after y'all click on the padlock. Now your photo volition be contained in "Layer 0." Feel free to rename this layer however you'd like.
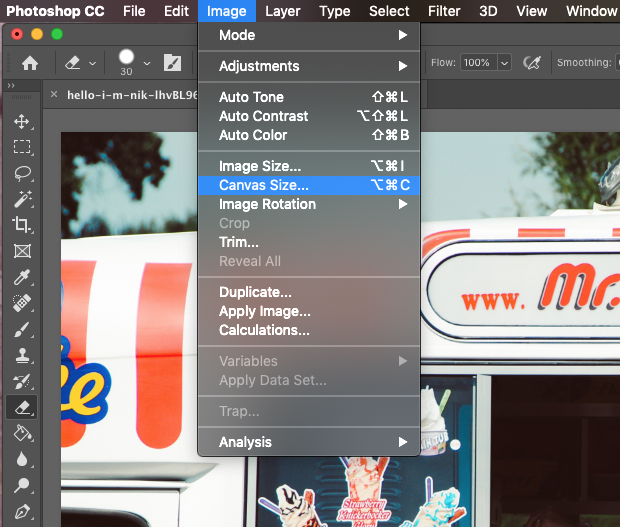
Side by side, y'all'll need to enlarge the canvas and then that there is space to include a border. Choose Prototype >> Canvas Size at the elevation of the Photoshop toolbar.
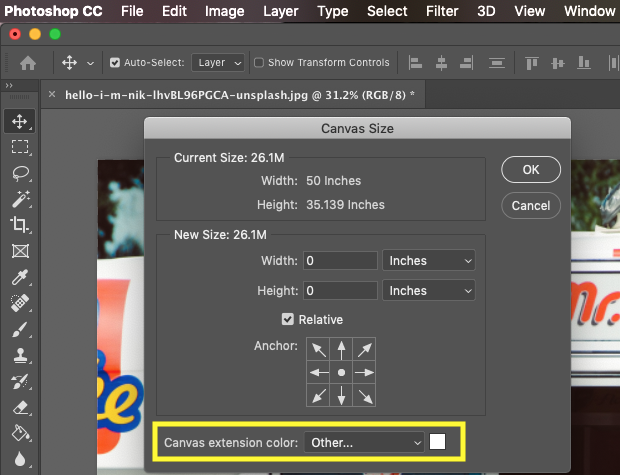
In the dialog box that appears, make sure to bank check Relative. Then, blazon in desired width of your border. In this case, I've chosen to create a 2-inch border around my photo.
Inside this dialog box, you tin can besides cull your border colour. Locate the Canvass extension color at the bottom of the box, and select the color yous'd like. I've chosen to proceed it simple with a white edge.
Every bit soon as you've completed these steps, your photo volition take a border! You can change the dimensions of your edge by readjusting the canvas size.
Creating a Custom Edge in Photoshop
If a plainly edge just isn't for yous, never fearfulness! Photoshop CS's brush tool makes it simple to create a customized border.
Open your photograph in Photoshop:

One time once more, I'm going to leave this photo unedited. If you are working with more than than one layer, Flatten them now.
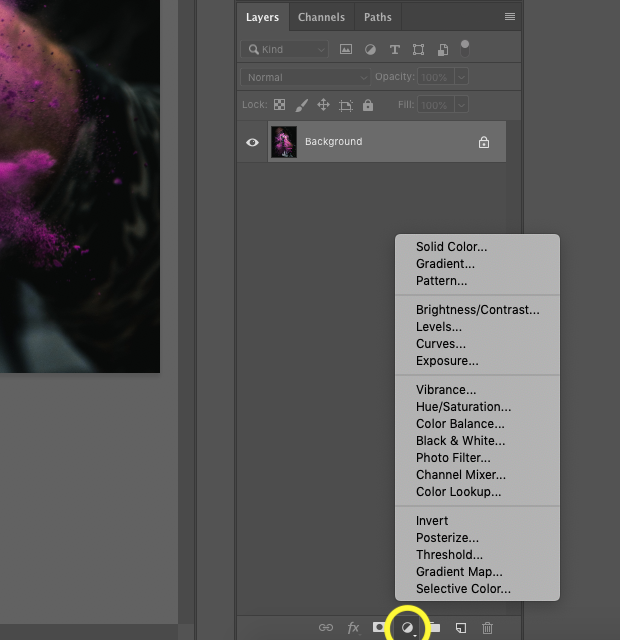
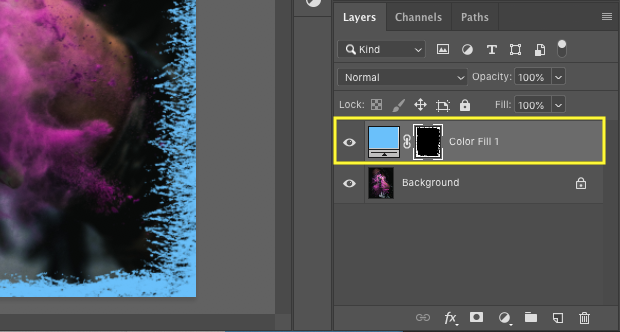
Side by side, I'm going to create a layer mask for this photograph. A layer mask volition let us to obscure and reveal portions of the photograph without manipulating it directly.
To make a mask, click on the Adjustment Layer icon at the bottom of the Layers console. Then select Solid Colour from the options that appear.
Choose a colour for your edge.
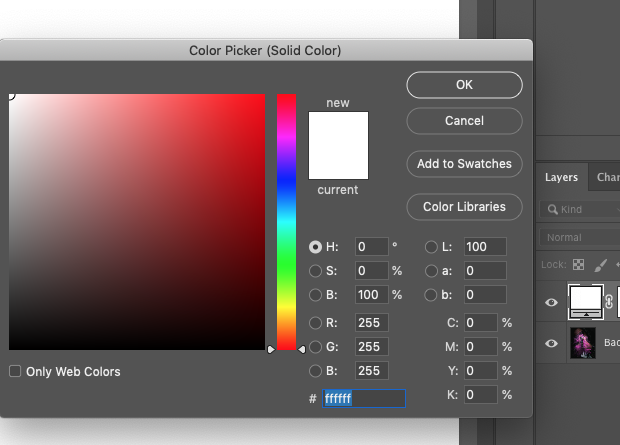
Once yous've selected a color, notice that the color of the aligning layer you lot created changes to match it.
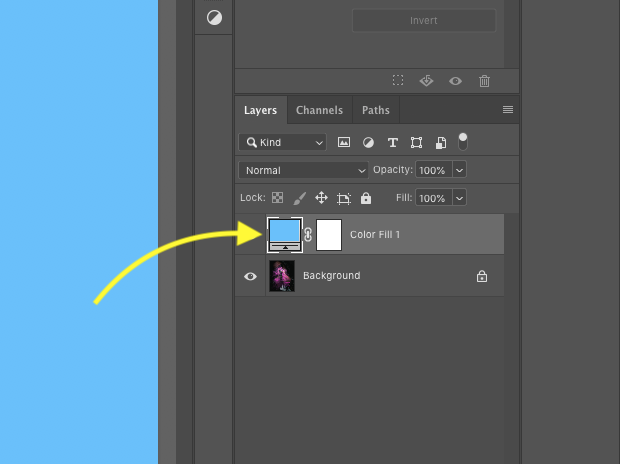
Yous'll see that the mask covers the whole photograph. We want our photograph to show through the mask, so double click on the mask and select Invert. The colour of your mask volition turn black, and your photograph will be visible.
Now you're gear up to paint your custom edge. In social club to do this, we'll exist using Photoshop's brush tool. Click on the castor icon to admission Photoshop's castor catalogue. Find the brush that suits your vision.
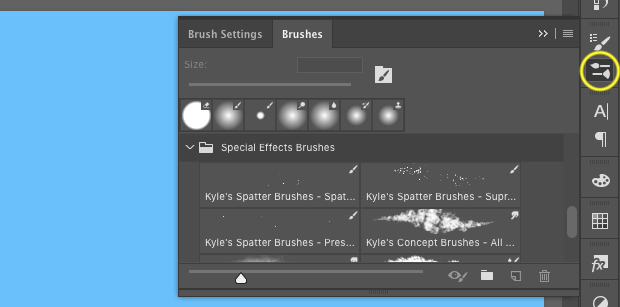
If you don't come across whatsoever brushes y'all like here, yous can always create your ain. Here, I'll be using a chalk-similar brush to create my border.
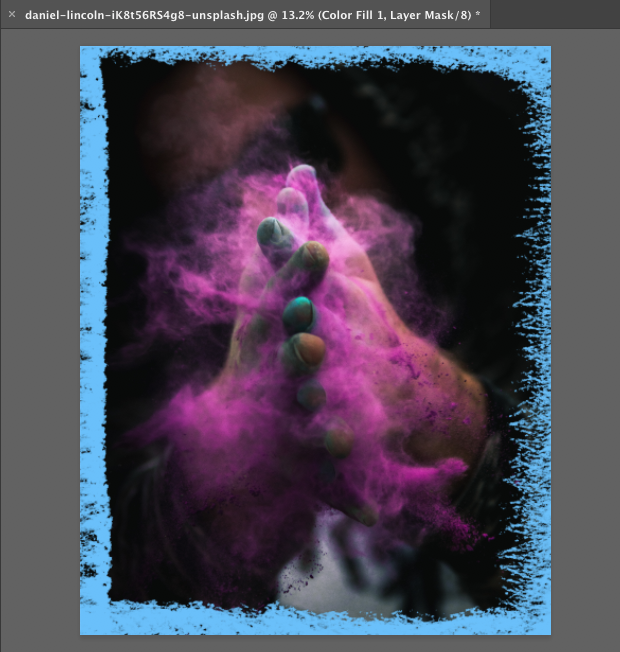
Using your brush, pigment white onto the mask to conceal the edges of your photograph.
The mask reveals your border wherever yous paint. The brush strokes you pigment appear on the blackness mask as white strokes, even though they reveal the blue background on the photograph.
My border looks similar this:
You can change the color of the edge by clicking on the solid layer. For this version, I used the color picker to sample the pink in the photo:
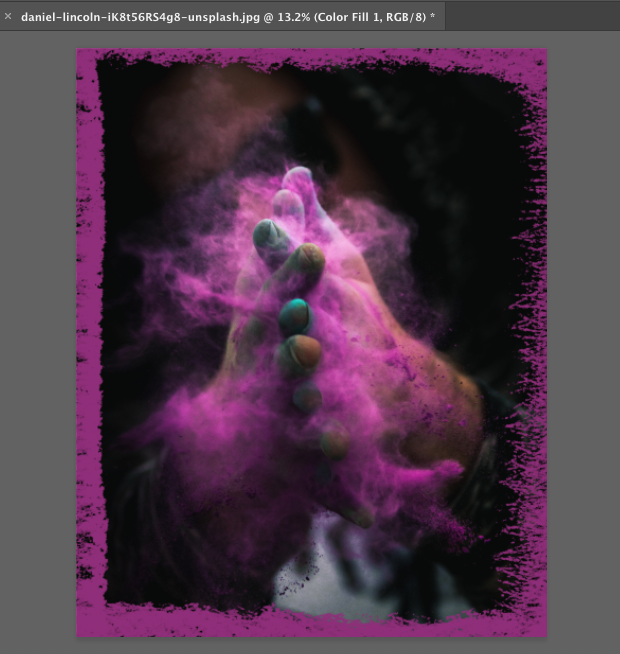
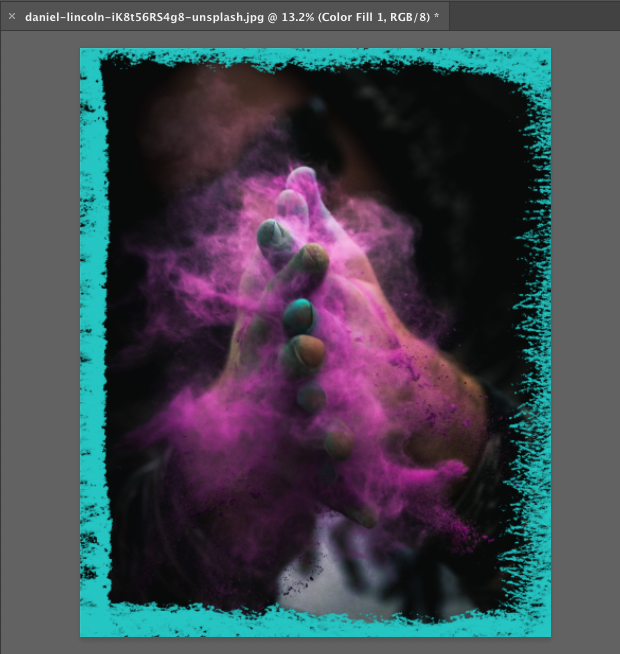
I sampled the blue-green color from the photograph using the color picker for this edge:
Experiment with the color of the border until you're happy, and then export your photograph. Save your Photoshop file so that y'all tin edit your border in the future.
Steps to Calculation a Border in Photoshop
The steps to calculation a border in Photoshop depend on the type of edge you want around your photograph.
In order to create a uncomplicated, solid-colored edge around your photograph, follow these steps:
- Open up your photograph in Photoshop CC
- Flatten your edited photograph
- Unlock the layer containing your photograph
- Get to Image >> Canvas Size
- In the dialog box that appears, click Relative
- Import the dimensions of your border
- Select your border color side by side to Canvas extension color
- Click OK
- Salve your Photoshop file so that you lot tin can edit your border in the time to come
Creating a custom edge effectually your photograph in Photoshop requires a couple additional steps. But, if you lot follow this protocol, yous won't have a trouble!
- Open your photograph in Photoshop
- Complete photo editing
- Flatten your edited photograph
- Create a Solid Layer from the New Fill up/Adjustment Layer push button
- Cull a color for your border
- Capsize the layer mask
- Choose a brush for your border
- Paint with white on the black mask to create your border
- Save your Photoshop file
If you follow these steps to adding a edge in Photoshop, you should accept no problem. But, there are more than online tutorials that tin can help.
All-time Tutorial for Calculation a Border in Photoshop
What is the best tutorial for adding a border in Photoshop? If you're a easily-on learner, then the best way is to practice yourself. But, the Internet has a wealth of great tutorials for adding borders to your photograph in Photoshop CC.
The best tutorial for adding a edge in Photoshop may depend on what you want your border to look like. Here are a few good tutorials:
- This video tutorial shows you how to add a border to a photograph you plan to post to Instagram.
- For help using Photoshop's colour picker to create your edge, this tutorial is helpful.
- Follow this guide for how to blur the edges of your photograph earlier calculation a border for an fifty-fifty more interesting look.

Download Photoshop through the Artistic Cloud Programme from Adobe then that you tin make interesting borders for all of your photos.
Let u.s. know in the comments beneath how your Photoshop borders are turning out! Follow us on Twitter and Facebook for more Photoshop tutorials and photo editing advice.
Using WordPress and want to go Envira Gallery gratis?
Envira Gallery helps photographers create cute photo and video galleries in but a few clicks and then that they can showcase and sell their work.
Related Posts


Source: https://enviragallery.com/how-to-add-a-border-in-photoshop/
Posted by: rosalesyourem35.blogspot.com
0 Response to "How To Insert Border In Photoshop Cc"
Post a Comment